Last Updated on December 25, 2020
Citrix Delivery Controller 1912 LTSR Installation and Configuration is the second article in Citrix Virtual Apps and Desktop 7 1912 LTSR Installation and Configuration Series.
Citrix Virtual Apps and Desktops 7 1912 LTSR Installation and Configuration
- Citrix License Server installation for Citrix virtual Apps and Desktops 7 1912 LTSR
- Citrix Delivery Controller 1912 LTSR Installation and Configuration
- Citrix Storefront 1912 LTSR Installation and Configuration
- Citrix Virtual Delivery Agent (VDA) 1912 LTSR Installation and Configuration
- Citrix Director 1912 LTSR Installation and Configuration
Following Topics are covered in this article
- Prologue
- Preparation
- Install SSL Certificate for Citrix Broker Service
- Install vSphere Root and vCenter Server Certificate
- Installation and Configuration
- Binding SSL Certificate with Citrix Broker Service
- Add Administrators to the Studio
- Add Hosting Connection and Resources
- Create Machine Catalogs
- Create Delivery Groups
Prologue
The Citrix site I am going to create will be used by users of one region only. There are two Datacenters in two different cities of the same region with a latency of less than 3ms that’s why a single site with its own SQL server site database is enough. If you happen to build a separate Citrix Virtual Apps and Desktops (CVAD) site in each datacenter, you can use StoreFront to aggregate the icons from all sites. And you can use NetScaler GSLB to distribute users to StoreFront.
I am not using Zones as resources are common for users in both Datacenters. From Citrix Docs – “Configuring zones can help users in remote regions connect to resources without necessarily forcing their connections to traverse large segments of the WAN. Using zones allows effective Site management from a single Citrix Studio console, Citrix Director, and the Site database. This saves the costs of deploying, staffing, licensing, and operating additional Sites containing separate databases in remote locations.”. Citrix recommends that when the network latency of your zones is more than 250 ms RTT then you should deploy multiple Sites instead of zones. Citrix also recommends that you limit the number of zones in your Citrix Virtual Apps or Citrix Virtual Desktops Site to no more than 50.
The host layer I am using is VMware vSphere 6.7 on Dell EMC VxRail vSAN streched cluster. It’s a 20 node cluster with cache and data tier on Flash drives. If you are fan of VMware Metro Storage Cluster (vMSC) then you are going to love vSAN streched cluster. The operating system I am using for Citrix Delivery Controller 1912 LTSR Installation and Configuration is Windows Server 2019 Datacenter Edition.
This is a very small Citrix Infrastructure with only 4 business critical and 10 utility applications mostly used by power users and office users. Critical applications have a upgrade life cycle of once in a year. With all these things I don’t see a compelling use case for any provisioning (MCS or PVS) or image management (App Layering) method. That’s the reason I decided to manually build VDAs from a standard template and then manually install applications on those VDAs. For almost same reason, I don’t think profiling, packaging and streaming applications will be beneficial.
I have always been fan of PVS but that doesn’t mean MCS can be looked down upon. Right here at PVS vs MCS , Daniel Feller has listed out all the features that are common or unique in both technologies. It will certainly help you decide which one to choose over other.
If you are looking for Citrix Provisioning 1912 Insallation and Configuration then visit https://www.carlstalhood.com/provisioning-services-server-install/
I am going to secure the XML communication between Storefront and Deliver controller that’s why a SSL certificate is to be issues to the FQDN of the Delivery Controllers 1912 LTSR and bound to the Broker Service. For this purpose I have created a enrollment template for server authentication in Internal Certificate Authority.
Preparation
- Download Citrix Virtual Apps and Desktops 7 1912 LTSR from here
- Visit System Requirements of Citrix Delivery Controller 1912 LTSR and ensure that minimum hardware requirements, OS requirements, DB requirements, etc. are met
- Create a service account in AD. This service account should be a Local Administrators on all Citrix Servers and should have sysadmin permission on the Database server instance. Once the DB schema is created, all run-time access to the central Virtual Apps site database is performed by the services running on each controller. These services gain access to the database through their Active Directory machine accounts (Domain\Machine$). This database access is sufficient to allow full day-to-day operation of the site including use of Desktop Studio, Desktop Director, and the service-specific SDKs. See https://support.citrix.com/article/CTX127998
- If for any reason the service account cannot be granted sysadmin rights then Citrix Site creation wizard allows you to generate some *.sql scripts that you can pass to the Database Administrator. The DB admin needs to execute those scripts in SQLCMD command-line utility or SQL Server Management Studio in SQLCMD mode. See scripted setup heading at Citrix Virtual Apps and Desktops 1912 LTSR Databases Technical Overview.
- To ensure automatic failover of databases consider using AlwaysOn Availability Groups (including Basic Availability Groups) or SQL Server database mirroring or SQL clustering or hypervisor’s high availability features. See High availability
- Create a VMware roles with a set or all of the privileges listed at VMware privileges required by Citrix. Assign that role to the same service account at the DataCenter level at a minimum.
- If you plan to use MCS, do not disable the Datastore Browser feature in vCenter Server. If you disable this feature, MCS does not work correctly
- Install SSL certificate on all Delivery Controllers to secure XML communication between Storefront and Delivery Controllers. Follow instructions in next topic
- Install SSL certificate issued by Certificate Authority to protect vSphere communications. If you are unable to use a digital certificate issued from a certificate authority, and your organization’s security policy permits it, you can use the VMware-installed self-signed certificate Follow instructions in next to next topic
- If you are using Azure Resource Manager to provision virtual machines in your deployment then visit How to Grant XenApp and XenDesktop Access to Your Azure Subscription
- Verify compatibility with License Server with Citrix Delivery Controller 1912 LTSR by executing LicServVerify.exe from CVAD ISO mount drive\x64\XenDesktop setup\

- Install Group Policy Management, RSAT Tools, Remote Desktop Licensing Tools, Telnet client and DNS Server Tools. If you wish, you can skip this step but I prefer installing them on Citrix Delivery Controller 1912 LTSR


Certificate for Citrix Delivery Controller 1912 LTSR Broker Service
- Open Run / Certlm.msc / Right click on Personal Certificate Store and select All Tasks / Request new Certificate
- Click on Next in Before you Begin screen

- Click on the drop down arrow in front of Active Directory Enrollment Policy

- Select the Enrollment Policy and click on Properties

- In General tab, give a Friendly name and a Description. This can be any string defining the purpose of the certificate. If it is a SAN certificate then I prefer to give a descriptive name like “Storefront Server and Base URL”. If the certificate corresponds to a single entity or object then I prefer to give the hostname or the NetBIOS name. Again, this is just a string.

- Switch to Subject tab. Under Subject name, select Common name from drop down. Type FQDN of the Delivery Controller Server in Value and then click on Add >. Click on Apply and then OK

- Click on Enroll
- Notice STATUS: Succeeded and click on Finish

- The certificate has been issued and installed in the Personal Store

- Repeat the same steps on Second Delivery Controller.
Certificate for vSphere Communication
- Login to the server where you will install Delivery Controller
- Open vCenter Server URL in the Web-browser
- Click on Download trusted root CA certificates

- Extract the downloaded file.
- Go to the win folder and double click on Security Certificate file

- Click on Install Certificate
- Check Local Machine under Store Location and click on Next

- Check Place all certificates in the following store, click on Browse, select Trusted Root Certificate Authorities, click on OK and then click on Next

- Click on Finish. Click on OK when Certificate Import Wizard says The import was successful


- Open vCenter Server URL again but this time in Google Chrome
- Click on Non secure in the address bar and then click on Certificate (Invalid). Even if you see Secure instead of Non secure in the address bar after installing root certificate in previous steps, this step is important to complete

- Switch to Details tab and click on Copy to File…

- Click on Next in Welcome to the Certificate Export Wizard

- Select DER or Base-64 and then click on Next
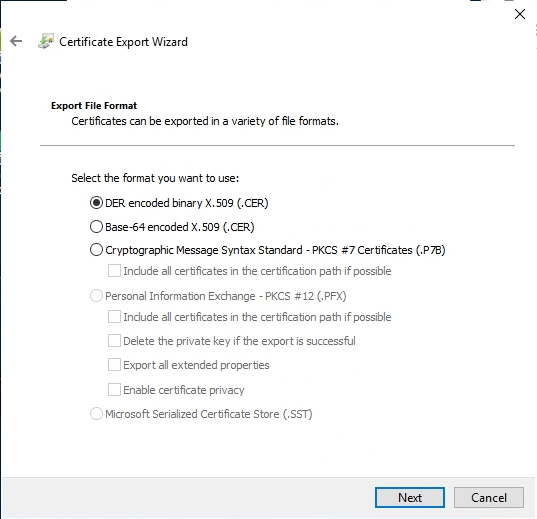
- Specify the location to save and click on Next

- Click on Finish. Click on OK when Certificate Export wizard says The export was successful


- Open Run / Certlm.msc. Right click on Trusted People store, click on All Tasks and then click on Import…

- Click on Next

- Browse the certificate that was exported in previous steps and click on Next

- Trusted People should be automatically selected in Place all certificate in the following store. Click on Next

- Click on Finish

- Repeat the steps on the second Delivery Controller.
Citrix Delivery Controller 1912 LTSR Installation and Configuration
- Login to the Machine where you want to install Delivery Controller software using a service account that is a local administrator and has sysadmin permissions on the SQL database instance
- Mount the media once download is complete. Run AutoSelect.exe as an Administrator

- If your license is for Virtual Apps then it does not matter whether you click on Virtual Apps or Virtual Apps and Desktops. Click on Start in front of Virtual Apps and Desktops

- Citrix Virtual Apps and Desktops 7 1912 LTSR Meta Installer window will show up. Click on Delivery Controller in Get Started

- Check I have read, understand, and accept the terms of the license agreement and then click on Next

- Keep Director, License Server and Storefront unchecked. It is all right to install all core components on one server if it is a small Citrix setup. Click on Next

- Uncheck Install Microsoft SQL Server 2017 Express CU16. Click on Next

- Automatically Should already be selected. Click on Next

- Click on Install

- Installation will prompt to reboot the machine multiple times. Click on Close. Machine will reboot

- Once the machine is up, installation wizard will prompt to locate the media. Leave it as it is, open File/Windows Explorer and mount the ISO. Come back to Locate ‘Citrix Virtual Apps and Desktops 7 LTSR’ installation media window, click on This PC in left pane, select DVD drive and click on Select Folder


- Installation will resume from where it left last time before the reboot
- If you wish to enable Citrix Call Home then check Collect diagnostic information otherwise click on Next

- Uncheck Launch Studio and click on Finish

- Install Delivery Controller Software on the second Delivery Controller
- Come back to First Delivery Controller and launch Studio
- Click on Deliver applications and desktops to your users

- Select An empty, unconfigured site and provide a name to the site. Click on Next

- Select Create and set up databases from studio
- If the service account that you used to open Studio does not have sysadmin permission on SQL server instance then select Generate scripts to manually setup databases on the database server. This action generates six scripts: two for each of the three databases (one for each principal database and another for each replica). You can indicate where to store the scripts
- Give those scripts to your database administrator. The site creation wizard stops automatically at this point; you will be prompted when you return later to continue the site creation.
- The database administrator then creates the databases. Each database must Use a collation that ends with “_CI_AS_KS”. Citrix recommends using a collation that ends with “_100_CI_AS_KS”
- The database administrator then uses the SQLCMD command-line utility or SQL Server Management Studio in SQLCMD mode to run each of the *.sql script
- When all the scripts complete successfully, the database administrator gives the Citrix administrator the three database addresses
- In Studio, you are prompted to continue the site creation, and are returned to the Databases page. Enter the addresses.
- For graphical representation of all these steps, visit Carl Stalhood’s Database setup using SQL Scripts.

- Click on Select in front of Specify additional Delivery Controllers for this site
- Click on Add; provide the FQDN of the second Delivery Controller. Click on OK and then click on Save

- Provide SQL Server\Instance in three Location fields. Click on Next

- Studio will start validating database details. If everything goes well, wizard will move forward to Licensing

- Provide License Server address and click on Connect

- On Certificate Authentication window, select Connect me and then click on Confirm

- Select Use an existing license and choose the correct license and model. Click on Next. Since I have imported 90 days Evaluation Licenses that’s why concurrent and user/device licenses for all three editions show up

- During Database validation, Studio detected that databases are not highly available. If you are using Always on/FA cluster/Mirroring then studio will detect that and show the secondary/replica/mirror database information
- Click on Finish

- Site creation process will start with configuring the services first and then creating the databases. This process might take some time


- Once the site is created, go the second Delivery Controller and refresh Studio if it already opened. Expand Configuration and click on Controllers. You should see both Controllers with status as updated 0 minutes ago. If you did not add the second Delivery Controller while providing database details during the Site creation process on First Delivery Controller then click on Connect this Delivery Controller to an existing site

- Provide the name of the First Delivery Controller and click on OK

- Click on yes if you are running Studio with the service account that has sysadmin rights on SQL server instance, otherwise click on No
- If you clicked on Yes, Studio will update the database and Second Delivery Controller will be added to the site
- If you click on No, Studio will prompt you to Generate scripts that you need to pass on to the Database Administrator
- For graphical representation of all these steps, visit Carl Stalhood’s Second Delivery Controller configuration.


- Verifying databases, DDC machine accounts and Database role assigned to the machine accounts inside SSMS


Binding SSL Certificate with Citrix Broker Service
- Open Notepad on First Delivery Controller and paste below command

- Go to Run / Certlm.msc / personal / Certificates. Double click on the Certificate that we installed earlier in this article. Switch to Details tab, scroll down to Thumbprint and copy the value

- Paste the value after certhash= in the notepad

- Add appid= to the command in Notepad

- Open PowerShell as an Administrator and execute below command
Get-WmiObject -Class Win32_Product | Select-String -Pattern "broker service"

- Copy IdentifyingNumber (GUID) and paste it after appid= in Notepad

- Copy the whole command and execute it in Command prompt as an Administrator

- You will get SSL Certificate successfully added. It means the binding of SSL certificate with Citrix Broker Service is completed
- Repeat same steps on Second Delivery Controller.
Adding Administrators to the Studio
- By default the user account that creates the site is assigned Full Administrator role
- To add more Administrators, expand Configuration and select Administrators. Click on Create Administrators on the left under Action Menu
- Browse a security group or an individual user account. Select All Scope and click on Next. You can create additional scopes as per your requirement

- Select the role and click on Next. In-built roles are enough for all type of administrative tasks; however, you can create a custom role by clicking on Create role.

- Check Enable Administrator and click on Finish

- Use Help Desk Administrator role for servicedesk or helpdesk executives. It gives them permission (among others) to log off a user session from Citrix Director and enable Maintenance mode on a server or desktop from Studio. Use Read only Administrator role for employees who should only have view access
- Below screenshot shows different roles assigned to different Security groups

Adding Hosting Connection and Resources to Citrix Delivery Controller 1912 LTSR
- Since we have already installed SSL Root and Server certificate of vCenter server on both Delivery Controllers, we are good to establish a connection with the Hypervisor, VMware vSphere in our case.
- Expand Configuration, right click on Hosting and select Add Connection and Resources

- Select VMware vSphere in Connection type
- Provide URL for the FQDN of vCenter Server
- Provide User name and password of the service account that appropriate role assigned to it at a Datacenter level in vCenter (Look at preparation topic of this article)
- Provide a Connection name of your choice
- Select Other tools under Create virtual machine using:. Click on Next
- If you are going to use MCS then select Studio tools (Machine Creation Service) under Create virtual machines using:. Click on Next
- On Storage Management screen, browse the vSphere cluster. Select Use storage shared by hypervisors and optionally check Optimize temporary data on available local storage. Click on Next
- Optimize temporary data on available local storage is similar to PVS’s(Citrix Provisioning) Cache in RAM with overflow to disk
- On Storage Selection screen, select the datastore you want to use for the placement of VMs. Click on Next
- On Network screen, provide a name to the Network and select a Network for the Virtual Machines. Click on Next
- For a graphical presentation of these steps, visit Hosting resources by Carl Stalhood

- Studio will start establishing a connection with vCenter

- Once completed, click on Finish

Machine Catalogs
- Right click on Machine Catalog and select Create Machine Catalog
- Click on Next

- Select Multi-session OS and click on Next
- For Desktop OS choose Single-session OS. For allowing users to connect to their physical PCs, select Remote PC Access

- Select Machines that are power managed under This machine Catalog will use:. Select Another service on technology under Deploy machines using:. Click on Next

- If you chose, Remote PC Access in previous screen, Power Manages option will be greyed out on this screen
- Notice that MCS is greyed out under Deploy machine using:. This is because I did not add any Hosting resource (Storage and Network). If you happen to do that, Machine Management screen will look like below screen where from drop down you can select the resource to place the VMs

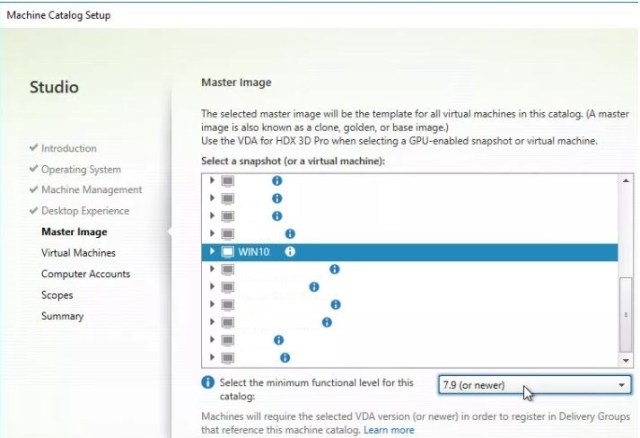
- If you select MCS, next screen will look this where you choose between persistent (static) and non-persistent (random) desktops


- On next screen, you can select the Master image
- Click on Add VMs, expand the cluster and select the Servers you want to add to the Machine Catalog

- Click three dots (…) in front of each VM and add the computer account

- Click on Next

- Provide a name to the Machine Catalog and click on Finish

- Create more Machine Catalogs as per requirement using the same process

Delivery Groups
- Right click on Delivery Groups and select Create Delivery Group
- Click on Next on Getting started with Delivery Groups

- Select the Machine Catalog to add the Virtual Machines to the Delivery Group. Choose the number of Machines you want to add and click on Next

- Select Restrict use of this Delivery group to the following users. Click on Add and add the user groups who should have access to the applications and Desktops published from this Delivery group. Later you can when you add the applications or desktops (hosted, pooled or dedicated), you can limit the visibility of each application and desktop by further restricting the access to only certain user groups. Click on Next
- If you check Session must launch in user’s home zone, if configure then user’s session will fail if VDA is not present in user’s home zone
- You create zones by right clicking on Zones and selecting Create Zone under Configuration in Studio
- By default all the resources are in Primary zone
- When you create a new zone, you can add Hypervisor connection, machine catalogs, etc. into that zone from the same window
- If you have created multiple zones already then you will get the option to choose the zone while creating a Hypervisor connection and adding Virtual Machines in the Machine Catalog
- Users are added to a zone by right clicking on zone and selecting Add users to Zone
- A user can be a part of just one home zone
- Applications are added to a zone by right clicking on zone and selecting Add Application To Zone
- Inside Zone of Published application’s properties, you can select a preferred zone for the application and restrict it to launch only in the selected zone. In the same window, you can choose not to configure any home zone for this application (Default option) and ignore the user’s home zone when launching the application
- There are three forms of zone preference. You might prefer to use a VDA in a particular zone, based on:
- Where the application’s data is stored. This is referred to as the application home
- The location of the user’s home data, such as a profile or home share. This is referred to as the user home.
- The user’s current location (where the Citrix Workspace app is running). This is referred to as the user location.
- How Zones work in Citrix Virtual Apps and Desktops 7 1912 LTSR from Citrix Docs is a must read

- Add applications by clicking on Add and selecting either of the option. Click on Next


- Here you can publish server’s desktop for only admins or for end-users depending upon the requirement. Click on Add, give a Display Name and Restrict desktop use to certain user groups or Allow everyone with access to this Delivery Group to use a desktop. Ensure Enable desktop is checked. Click on Next
- Users will see a Desktop icon by the name Test Desktops (Display name) and when user clicks on it, Delivery Controller will load balance sessions between all the Machines that are part of the Delivery Group
- Suppose you have 10 machines in the Delivery Group and you only want to publish the desktop of only 5 of them or you want to publish 5 server’s desktop to a particular user group and remaining 5 to another user group then you can assign tags to Machines and Restrict launches to machines with certain tags
- Tags are very useful. They can also be used to publish applications from particular servers in a Delivery Group. Check out Publishing Applications From Individual Servers In XenApp 7.X. This article also explains how to create Tags and assign them to machines


- Give Delivery Group a Name and Description and click on Finish

Hello Gupta, I was tasked to deploy our new Citrix VDI environment. I had not touched Citrix for a while much less build it from scratch. Your article was so helpful as you didn’t miss a step and I was able to build it in one shot. This was a HUGE accomplishment for me and you were my reason of achieving it.
We stood up a new Citrix VDI environment with your guidance. Thank you so much for sharing empowering, encouraging and inspiring. I have used your Delivery Controller, StoreFront and Director. I will be adding this post to all three as you have been such a crucial part of our build out.
With gratitude and appreciation,
Mustafa